Flying Cloud – overdrive with its own tone in a 1590A enclosure

IMG_20180516_191822_HHT

This new project is based on that archi-known japanese green overdrive. It is different in the component values (as many clones over there) and in the absence of tone control.

It all began as a simple overdrive circuit to be hidden inside a stratocaster, and it lived like that for a couple of days. For that purpose I didn’t need a tone control, because the guitar has its own one, and the amount of distortion was controlled by one of the strat pots (the middle one), while the other tone pot was controlling the tone of all pickups and also of the overdrive circuit.

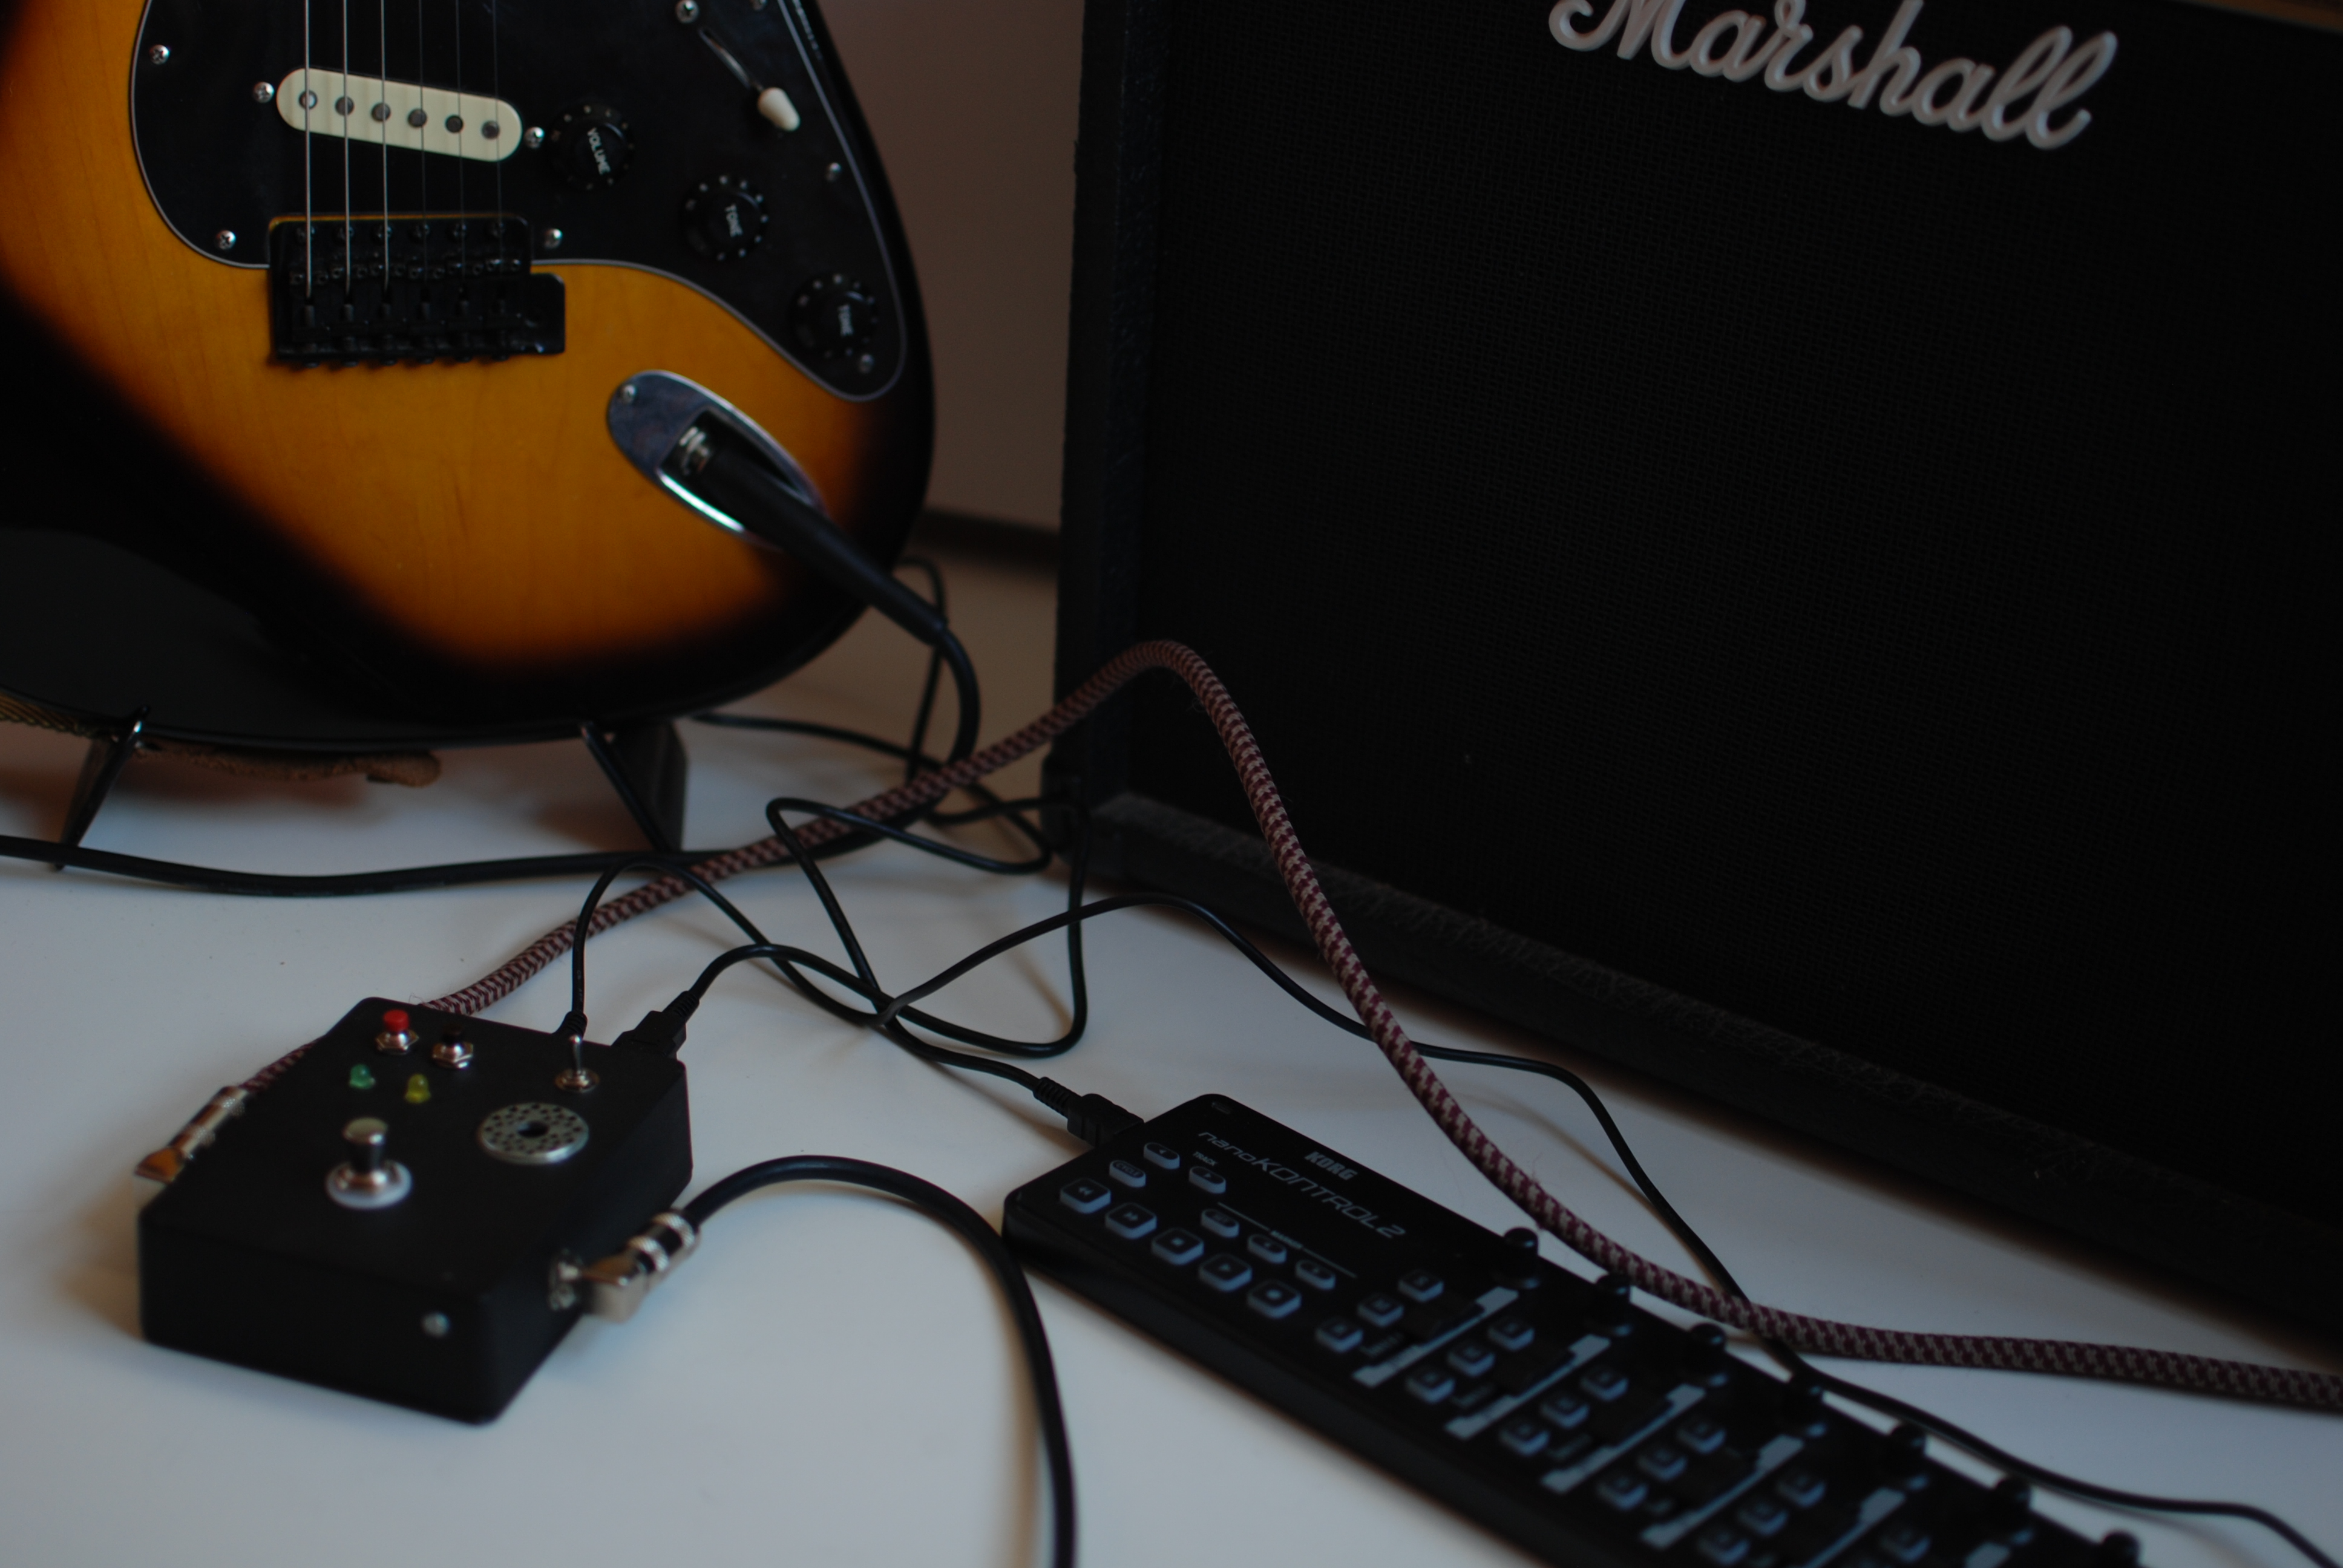
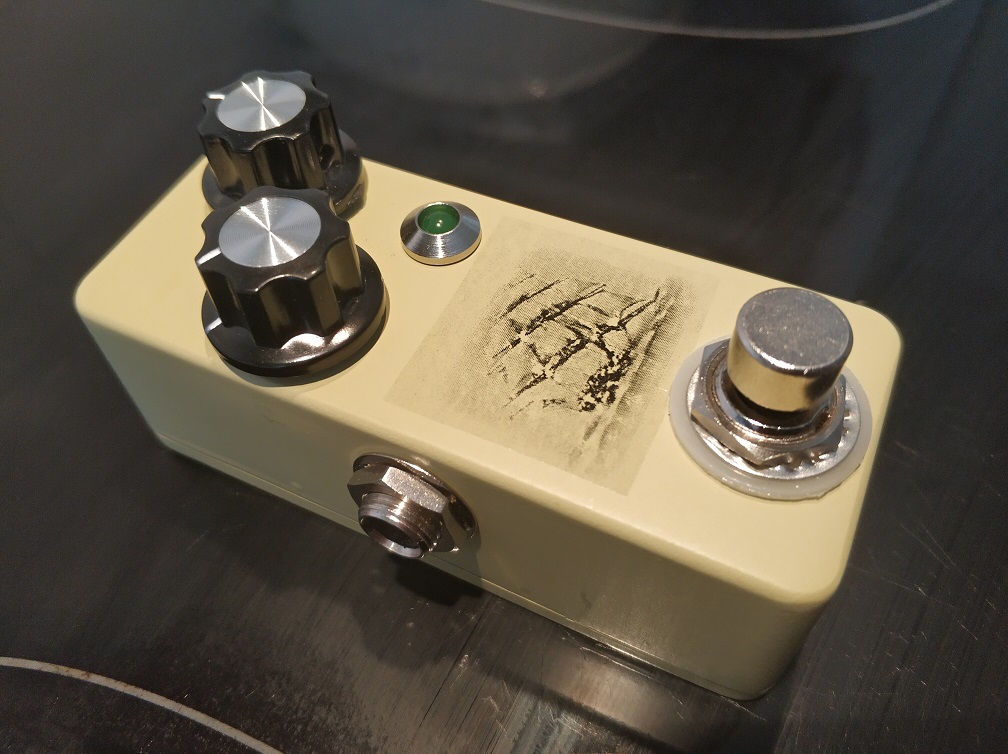
After trying the concept, I didn’t like the idea and removed the artifact from the guitar. But I liked the tone and tested it as an independent effect, even without the tone stage. Also, it would fit inside a 1590A enclosure, hence being a very practical device as a backup for my regular overdrive pedal or to be carried to jams or occasional gigs.

Here is the pcb (veroboard) after leaving its guitar life and before starting to be an effect pedal:

IMG_20180515_192943

And the schematics:

fc_esquema

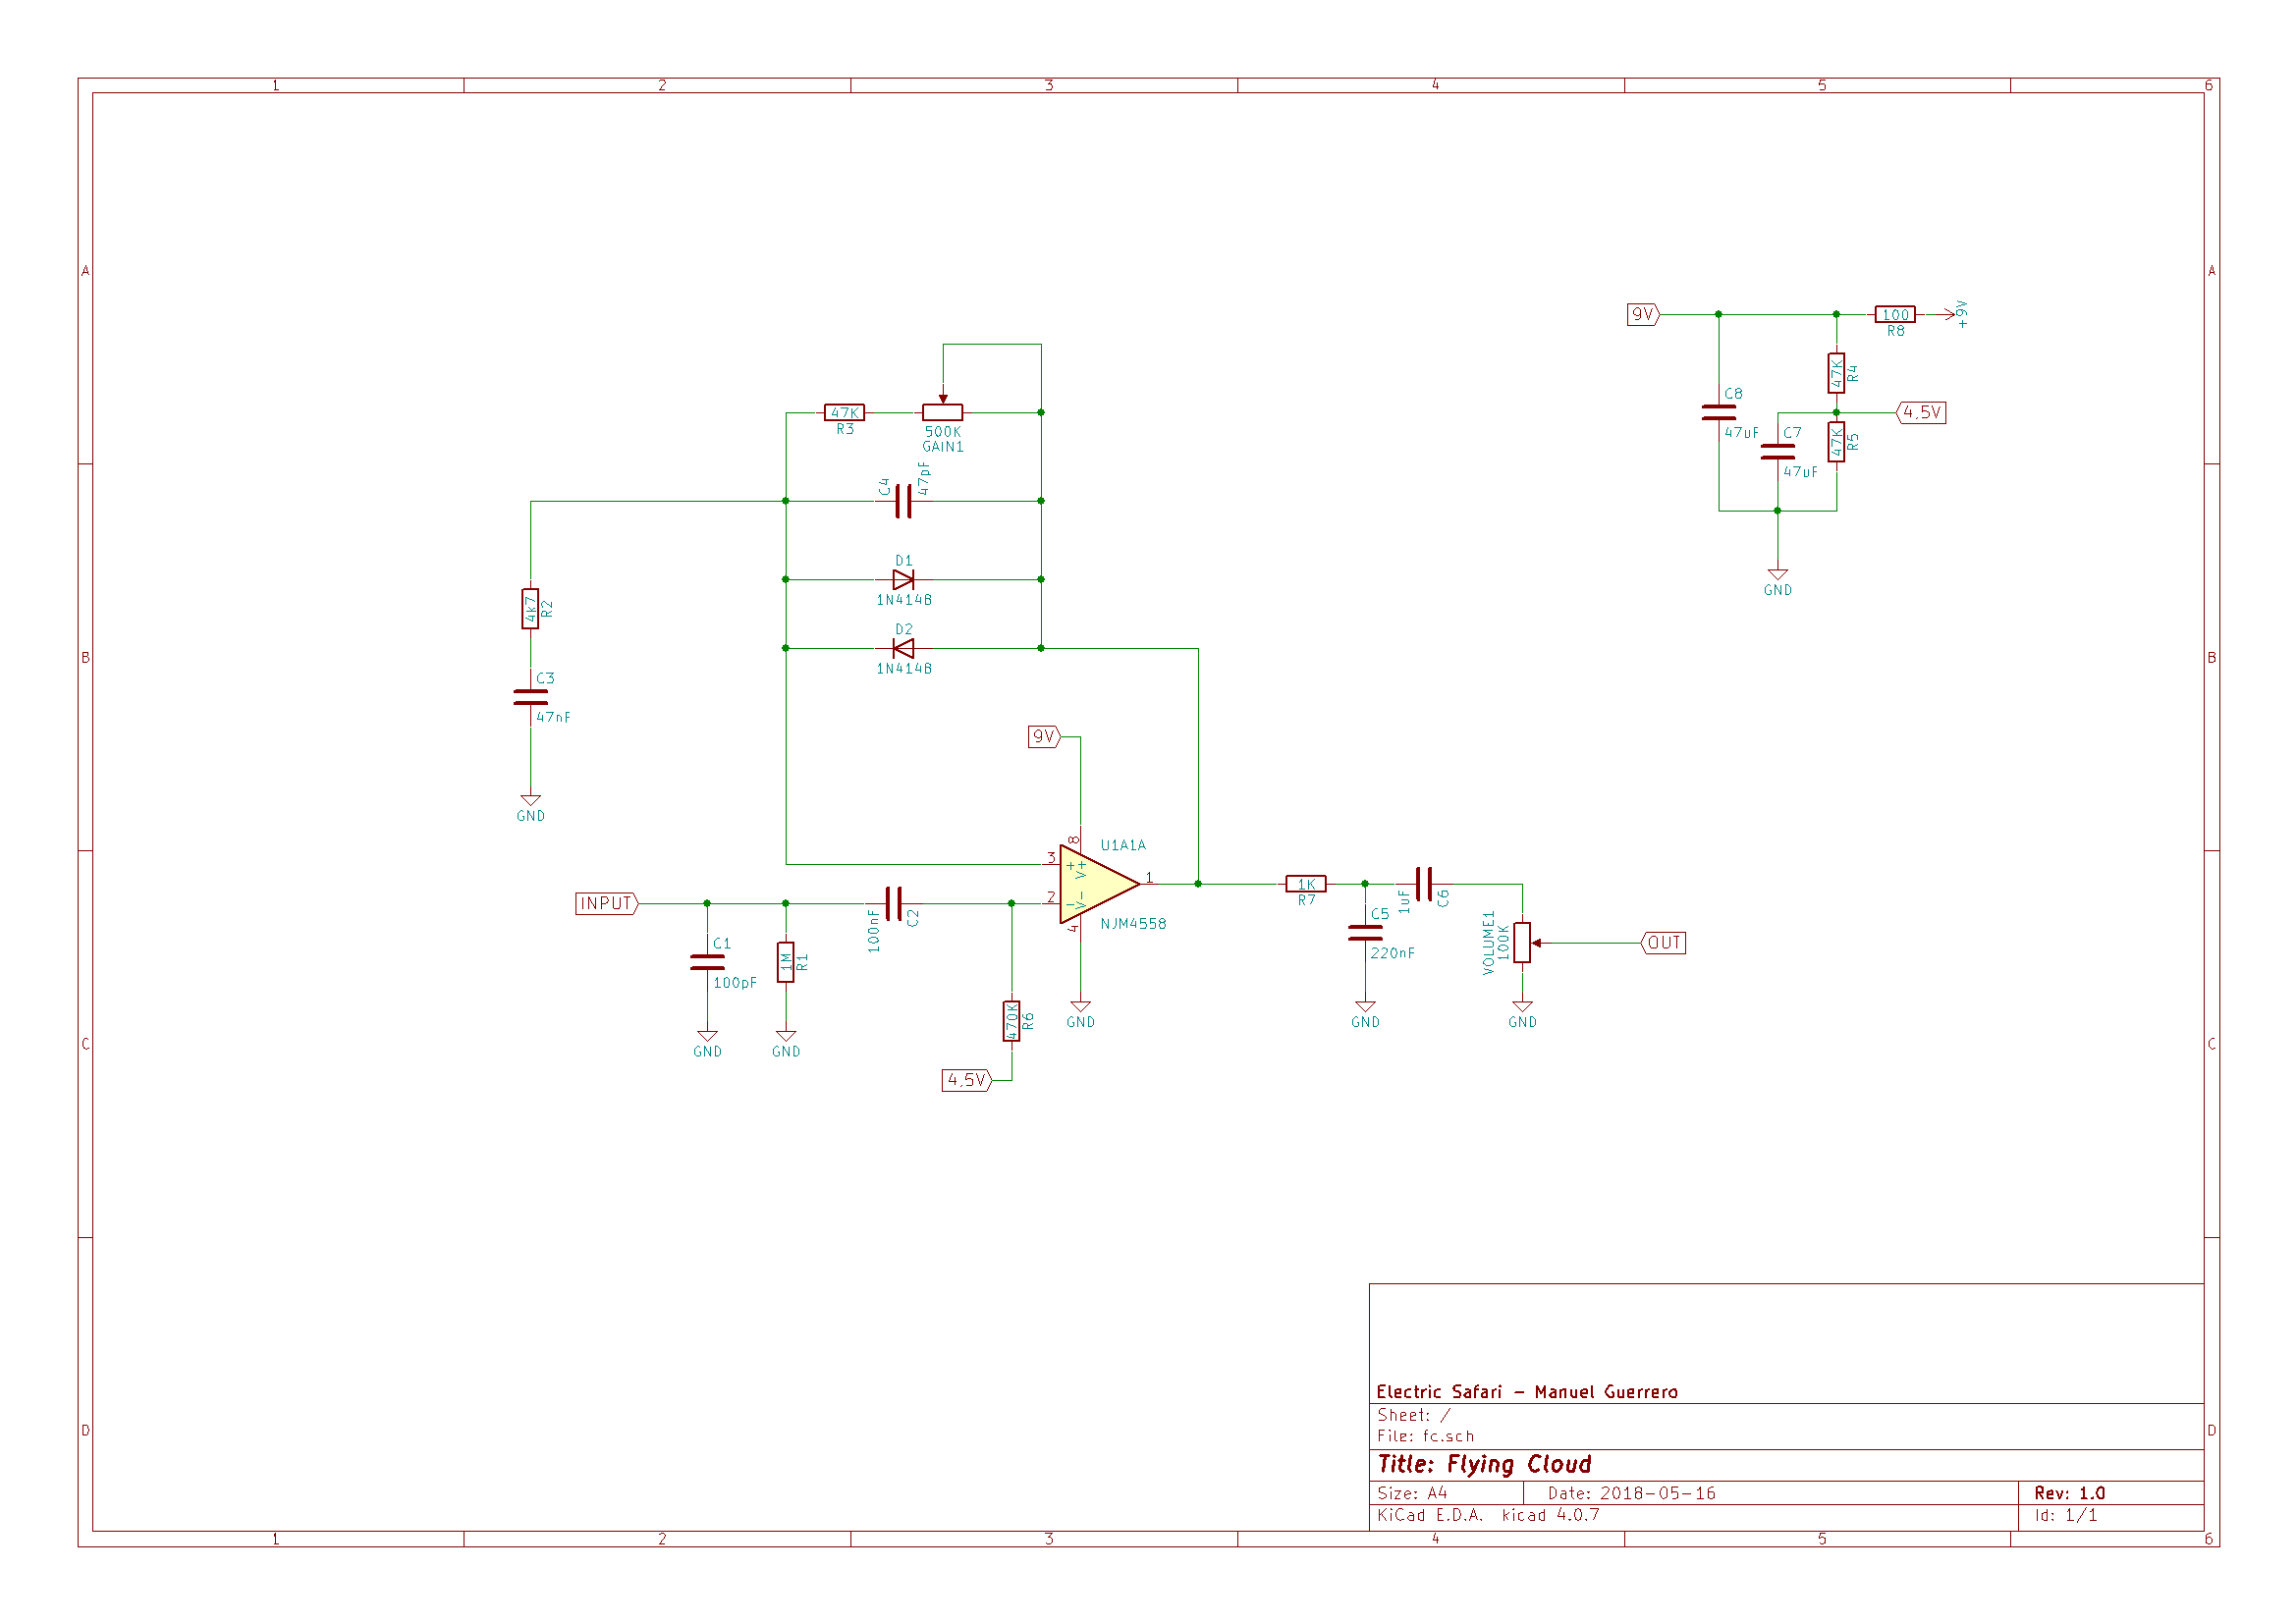
As you can see, it is basically a thatjapanesepedalthateverybodyhascloned but there is no tone stage. Compare with: https://www.electrosmash.com/tube-screamer-analysis

I can live without tone control, because almost all electric guitars has at least one tone control, I have an equalizer pedal and all amplifiers have a tone stack. I have adjusted the tone in the circuit to my preferences, but some components can be changed to shape the tone. On the other hand, the tone stack can be missed if you have other effects after this one that can be affected by its tone (stacking overdrives, phasers, etc).

Of course, feel free to use the concept and the schematics if you like it. If someone needs the veroboard layout I can prepare it and publish it also. Just buy me a beer and we’re even 🙂 I’m planning to record a demo for this pedal in the following days.

And why the name? The Flying Cloud was a fast clipper that sailed the seas in the XIX century. I like ships and this pedal is also a fast clipper (a soft clipper, to be more exact).

PD: the 220nF capacitor at the output of the operational amplifier can be removed for a less muddy sound. It is included in the original green overdrive and I had to included it at first in order to avoid oscillation with an LM348 as operational amplifier. After switching to 4558 kind of IC, the oscillation is not present even in abcense of that capacitor.

LM358 has a slew rate of 0.3V/uS, while JCR4558 has a slew rate of 1V/uS, which I think is the cause of that difference.

Advertisement

EQD Tentacle clon in 1590A enclosure

Mission acomplished! I managed to fit an octave pedal in a 1590A enclosure. It is not hard because you don’t have any potentiometers at all. That’s why I chose this effect to be my first 1590A project. It sounds great, by the way, thanks to the guys in tagboardeffects for the layout:

http://tagboardeffects.blogspot.com.es/2016/11/earthquaker-devices-tentacle.html

In order to save space, two rows have been omitted from the layout, so it is 19×9 instead of 19×11. There are two rows with no components, they can be saved by using small resistors and ceramic capacitors.

I have put the octave after wah and compressor and before overdrive, not sure if that is the right place, let’s give it a chance.

img_20180512_152905_hht.jpg


BOSS FW-3 Mods

I have a BOSS FW-3 pedal bought in the 90’s when I started to play guitar, looking for a Jimi Hendrix or SRV sound. Why this pedal instead of a Cry Baby or VOX? Because back then you bought what they had in the shop.

20170727_155340

Some months ago I decided to sell it because I didn’t like its sound and behavior any more. Too subtle when placed before dirt and too uneven in volume when placed after. But nobody seemed to be attracted to this squared tank in spite of the low price I asked for it, so I kept it.

It is not a bad product compared to other wah pedals, it is just you get sick of the same tone and problems, and want to get a different tone (and problems). In fact I like its size and robustness, it is solid like a tank and fits very well under my feet.

So I decided to tweak it a bit in order to find a different sound, and started to look for possible mods in the web: nothing at all.

After studying its circuit, I found that the BOSS FW-3 wah pedal is essentially a modded Cry Baby. A very clear and in depth analysis of the Dunlop Cry Baby can be found here: https://www.electrosmash.com/crybaby-gcb-95

There is plenty of information about mods for Cry Baby. In many sites they talk about these particular mods, in Cry Baby terminology, for a GCB-95 PCB:

  • True bypass (more details in the referenced sites)
  • Mid range response: R1 resistor change from  1.5K to 2K-2.7K
  • Q: R5, from 33K to a bigger value, up to 100K. This mod is already done in a BOSS FW3, there is a pot in the pedal panel for adjusting this value.
  • Sweep Range, change C5 from 0.01uF to a bigger value for lower frequencies and a lower value for higher frequencies range. Typically 0.068uF for a bass wah.
  • Gain and bass response: changing R9 from 390 to a lower value will raise gain and add bass content, while a higher value will reduce the gain

In order to apply this valuable information to modify a FW-3 and find our personal tone, we need to map these components to those found in the BOSS PCB. I didn’t fight with the true bypass mod because I like the BOSS buffer, and it is useful for me in most situations.

From the schematics:

FW3

Mod Cry Baby (GCB-95) FW-3
Gain R9 R6
Sweep range C5 C12
Mids response R1 R4

See below the pictures for FW-3 pedal PCB. In the top picture I have marked these components in the board.

IMG_20180201_143735_HHTIMG_20180201_143846_HHT

Which values to choose depends a lot on your personal preferences. I have experimented with some values and ended choosing these ones:

  • R4 (Mids): 2.2K, gives some more mids content.
  • C12 (Sweep range): .022uF, lowers the sweep range in the frequency spectrum, giving a very pronounced WOOOO effect in the lower frequencies end.
  • R6 (Gain): 390. It lowers the gain a bit, making it more even with the effect not engaged

These values give a very personal tone to the FW-3 wah. Even placed before dirt, the effect is very pronounced and significantly different from the original, specially in the lower end of the sweep range.

In a next post I will try to record the sound of the modified pedal.

I’m planning to add some pots in the future to regulate the mids and gain, and even a selector to change among different values for C12. The unit has space in the panel to place the pots and enough space inside to place another two PCBs, so I think it is a perfect platform to play around a bit.

References

http://stinkfoot.se/archives/549

http://www.wah-wah.co.uk/diy.html

https://www.electrosmash.com/crybaby-gcb-95

PD: si hacéis ese mod, ponedlo en los comentarios abajo. Me gustaría saber si la gente disfruta (o no) de mis mods.

POP: Autoovation feature

Now POP has a new feature, that I call “autoovation”. You start playing with your favorite effect, and when you stop playing, sometimes, if the pedal likes your performance, you hear an ovation from a digital audience.

Autoovation is made basically by detecting audio activity in input, then waiting for silence and playing a file randomly from a list of mp3 recorded ovations. For audio detection, silentjack (https://www.aelius.com/njh/silentjack/) was used (thanks Nicholas J Humfrey for your work and for letting me add a feature to your code).

This feature is just a joke, of course, but gives an idea of the kind of things that can be done with a device like this one. Think about things like backing tracks, automated rythm boxes, etc.

POP: noise reduced and schematics uploaded

After cabling audio internally with shielded wires, and solving a grounding problem in the input jack, noise has been reduced drastically when working from battery. There is still an annoying computing noise when connected to an external 9V power supply. I am going to put a removable ferrite bead, still waiting for the parcel to arrive.

I have also finished schematics for the project, that have been uploaded to https://www.hackster.io/manolonte/pop-programmable-open-pedal-9acddf

popv1-0_esquematico


Next steps:

  • Trying with ferrite bead
  • Adjusting output volume, too high right now
  • Giving a function to second switch, maybe fast reset for changing mode quickly
  • Reducing latency
  • Creating new effects: some ideas:
    • dubbler
    • auto-ovation: just for fun, when you stop playing, simulate an audience ovation, just like in  “Blues Deluxe”, from Jeff Beck Group
    • tremolo, phaser, etc.

POP: Programmable Open Pedal, first test

First recordings of POP through a Fender Blues Deluxe 40W AB tube amplifier. Camera is a GO Pro HERO. The amplifier is looking towards the wall in order to save our ears. Guitar is a Yamaha Revstar 420, I love it.

Impressions

Sound quality looks promising, though still I can hear some computing noise, specially when configuring a compressor or a distortion/overdrive. When using delay type effects, or reverb, noise is quite bearable.

I am using a 512 bytes buffer, and getting around 20ms of latency, still too much.

Some more research is needed to get the best from this unit, keeping in mind the limitations: CHIP board works at 1GHz, and sound card is integrated in the SoC, as long as I know.

Stay alert for new tests.

I have also still to publish some documentation about the project. More details can be found here: https://www.hackster.io/manolonte/pop-programmable-open-pedal-9acddf

https://www.hackster.io/manolonte/pop-programmable-open-pedal-9acddf/embed?use_route=project

Please leave any feedback you consider relevant or funny.

POP: Programmable Open Pedal

What is POP?

dsc_0022

This is my most recent project. Based upon the C.H.I.P. board form Next Thing Co, I have built a stompbox guitar digital pedal. These are its main features:

  • stereo output
  • true bypass
  • standard 9v input
  • three modes of operation
  • reset/shutdown  button (the red one)
  • additional programmable button (the black one)
  • wifi, enabled inly in one of the modes
  • microusb input, for serial connection
  • USB  input, where you can connect a MIDI controller, so effect parameters can be modified on the run
  • backup battery, so if you unplug the unit, you have the chance to shutdown gracefully

C.H.I.P board offers a good opportunity to build this kind of units because it has audio capture capabilities natively, without the need to plug an external (usually slow) USB sound card.

At this moment I am still doing tests, trying to improve sound quality. Some software stacks I have tested up to now:

  • Rakarrack on jack: unstable in this platform
  • Guitarix on jack:  quite stable and very good sound quality, but a lot of CPU consumption. The good point is that you can configure and control the unit graphically, doing a SSH -X from a computer.
  • Supercollider on jack. Super-flexible, Supercollider is a programming language, so you can create any effect your imagination dictates. The problem is that I haven’t reached the sound quality I am looking for, maybe a SC expert can do.
  • LV2 plugins on jack, running with mod-host. With this combination I have got the best results, in a next post I will upload some sound clips. You can control parameters with a MIDI controller, and preset parameters. You can choose from a huge list of already programmed effects, and combine them in any order.

My current software configuration is based on LV2 on jack. I have programmed three modes of operation using the switch you can see at the right in the above picture:

  • switch up: double delay, controlling feedback and delay time of the two delays with a Korg Nanokontrol2 MIDI controller
  • switch middle: compressor, controlling attack, release and gain
  • switch down: reverb, controlling room dimensions and warmth. In this position, I activate wi-fi interface and sshd, so I can connect my computer and make changes, update the software, fix issues, etc.

Some advices for anyone looking for something similar:

WIFI

Wireless interface can be a problem if you enclose a computer inside an aluminium box, as is the case in this project. If you use a plastic box, you will have too much electromagnetic noise. For a compromise, I decided to drill a hole in the case, right above the wireless antenna. With an eight millimiters hole, and putting the unit not far from an access point, I am getting a quite good network access.

FAN

Another problem derived from the case is temperature. Without a fan, temperature was reaching 70 Celsius degrees. With a small 12V 25 mm fan, powered at 9V, temperature keeps stable at 51 degrees, even lower with wireless deactivated. I put the fun below the hole I had already done for wifi waves to escape the enclosure, as you can see in the pictures just below the switch.

JACK

I mean jack software. You have to compile it for no GUI, as they describe here: https://capocasa.net/jackd-headless

For the rest of the software (LV2, mod-host) I will write a dedicated article.

SOUND INPUT AND OUTPUT

I have got the best results using the minijack input for audio capture, and board connectors for output. I have grounded the audio capture and output with the board connectors and at this moment there is almost no computer noise.

POWER SUPPLY

My advice is to power the board using pin U13-2 CHG-IN, instead of powering it using the microUSB connector: it is discussed here: https://bbs.nextthing.co/t/chip-power-pins-maximum-current/7164/9.

I built a 5v/9v converter using a tipical 7805 IC, and fixed to the case with a screw. Don’t put the thing too close to the board.

FLASHING CHIP

With kernel 4.4, I got errors when capturing audio, so I sticked with kernel 4.3, until I can do some new tests or someone tells me it is fixed:

https://bbs.nextthing.co/t/dsp-with-c-h-i-p-and-audio-capture/6993/5

dsc_0006

So I am very excited now with this project. My main concern now is sound quality and usability.  I’ll write some additional posts with audio clips and new notes and advices. I would like to upload some schematics with the internals of the unit.

If someone is interested in more details about the project, or have some questions, please write some comments,  or send me an email to manolonte@gmail.com.